The Tuna Melt: A Culinary Rebel's Delight
Ah, the tuna melt. Just uttering its name conjures images of gooey, melted cheese, warm, crisp bread, and a savory, satisfying filling. It's a sandwich that defies culinary snobbery, unapologetically pairing fish with cheese – a combination some chefs famously advise against. Yet, as many late-night diner-goers (including, perhaps, those very chefs) will attest, the tuna melt is more than just a guilty pleasure; it's a testament to delicious simplicity. This isn't just any tuna melt; this is your guide to crafting the ultimate version, focusing on flawless flavorful versatility and mastering the crucial broiler steps to achieve perfection.
The beauty of a truly great tuna melt lies in its ability to transcend its humble ingredients. It can be a quick, easy lunch that shakes up your routine or a comforting late-night meal that hits all the right notes. The secret? It’s not about being fancy; it’s about making every component shine, particularly the tuna salad itself and the final, glorious broiling process.
Crafting the Core: Your Ultimate Tuna Salad
The foundation of any exceptional tuna melt is a tuna salad that is anything but bland. Forget the dry, uninspired versions you might have encountered. Our goal is a vibrant, flavorful mix that tastes incredible on its own, and even better when nestled between bread and crowned with cheese. This is where you can truly convert tuna haters.
Building Layers of Flavor and Texture
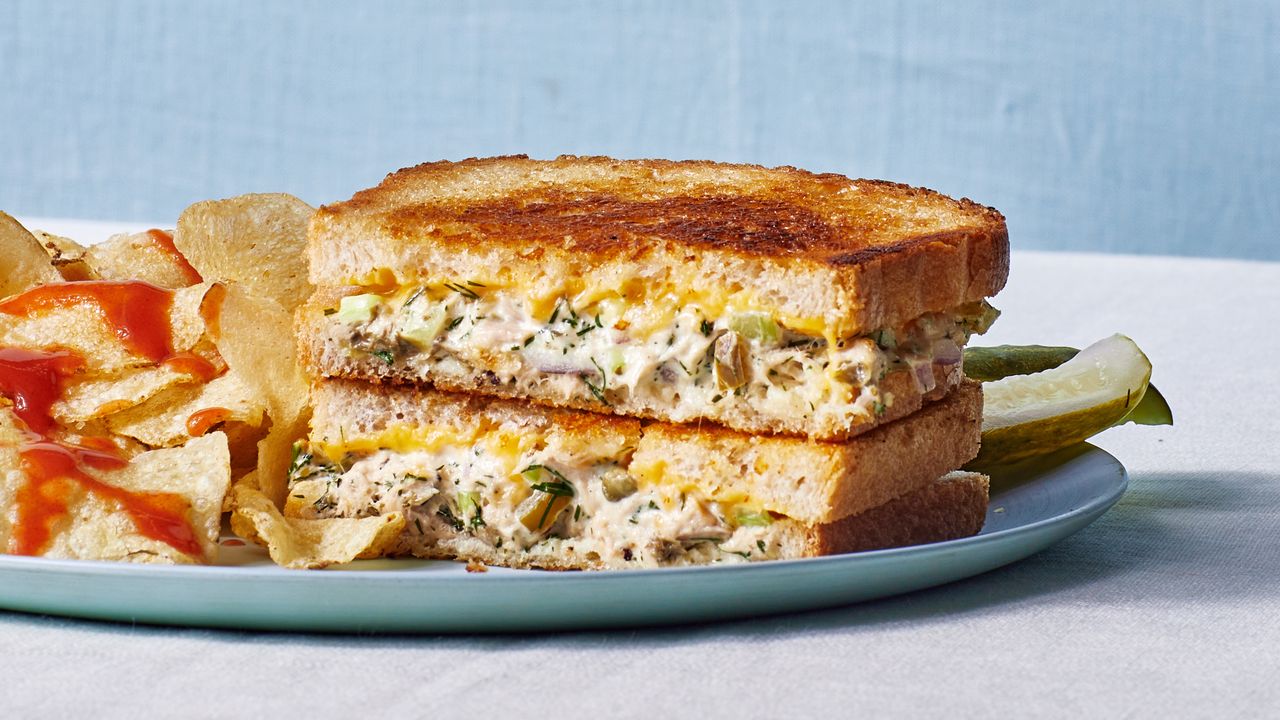
To start, select your tuna. While oil-packed tuna often offers a richer flavor and moister texture, water-packed tuna is a healthier alternative that works beautifully when seasoned well. Whichever you choose, drain it thoroughly, then transfer it to a small mixing bowl and break it up gently with a fork. You want flakes, not mush.
Now, let's infuse that flavor and crunch:
- The Crunch Factor: Finely diced celery is a classic for a reason – it provides a crisp texture that contrasts beautifully with the soft tuna. But don't stop there! Consider adding finely chopped red onion for a sharper bite and a hint of color, or even a tablespoon or two of sweet or dill pickles (or relish) for an extra layer of tangy crunch.
- Herbal Freshness: Fresh parsley, finely chopped, adds a bright, herbaceous note that elevates the entire salad. Dill is another fantastic option for a more distinctive, aromatic profile.
- The Creamy Bind: Mayonnaise is essential. Use a good quality brand that you enjoy the taste of. For an extra zing, whisk in a teaspoon of Dijon mustard. This adds a subtle tang and depth that plain mayo alone can't achieve.
- Seasoning & Acidity: Season generously with freshly ground black pepper. Salt should be added judiciously, tasting as you go, especially if your pickles or mustard are already salty. A squeeze of fresh lemon juice is non-negotiable – it brightens all the flavors and cuts through the richness of the mayonnaise, making the salad sing.
- Optional Kicks: For those who like a little heat, a pinch of red pepper flakes can provide a welcome warmth without overpowering the other ingredients. A dash of hot sauce, like Tabasco or sriracha, can also be a game-changer for spice lovers.
Once all your ingredients are in the bowl, stir gently to combine. Be careful not to overmix, as this can break down the tuna too much. Taste and adjust seasonings – this is your chance to perfect it before it even hits the bread.
The Broiler Brilliance: Achieving Melty Perfection
The broiler is where the tuna melt transforms from a good sandwich into an exceptional one. It toasts the bread, warms the tuna salad, and, most importantly, melts and slightly browns the cheese into a glorious, bubbly blanket. Mastering the broiler takes a little attention, but the rewards are utterly worth it.
Prepping for Perfection: The Foundation
- Preheat with Purpose: Position your oven rack about 4 to 5 inches from the broiler heating element. This distance is crucial for even melting without burning. Turn on your broiler and let it preheat for at least 5-10 minutes. A well-preheated broiler ensures immediate, intense heat, which is what you want.
- Choose Your Bread Wisely: Hearty slices of sourdough, rye, brioche, or even English muffins work wonderfully. Avoid overly thin or flimsy bread, which can quickly become soggy.
- The Initial Toast: Arrange your bread slices (or split muffins) on a baking sheet. Place them under the preheated broiler for 1-2 minutes, just until they are lightly golden and slightly crisp. This initial toast creates a barrier against sogginess and adds structural integrity to your sandwich. Keep a close eye on them, as broilers can be fierce!
- The Mayo Layer (Optional, but Recommended): Once lightly toasted, remove the bread. If you like, spread a very thin layer of mayonnaise on the inner side of each slice. This adds another layer of flavor, helps prevent the bread from drying out, and can even contribute to a beautiful golden crust when broiled.
Broiling for Gooey Goodness: The Grand Finale
With your toasted bread ready, it's time to assemble and broil:
- Assemble with Care: On your prepared, lightly toasted bread, generously spoon your ultimate tuna salad. Don't be shy!
- Cheese Please! Now for the star of the show: the cheese. Shredded cheese melts more evenly and quickly than sliced cheese. Good quality sharp cheddar is a classic choice, offering a robust flavor that stands up to the tuna. Other excellent options include Monterey Jack for its fantastic melt, Swiss for a nutty tang, or a blend of your favorites. Pile it on top of the tuna salad.
- Into the Broiler: Carefully slide the baking sheet back under the preheated broiler.
- Watch Like a Hawk: This is not the time to walk away! Broilers cook quickly and can go from perfectly golden to burnt in seconds. Keep a close eye on your tuna melts.
- The Melt Mark: Broil for approximately 3 to 5 minutes, or until the cheese is bubbling, completely melted, and boasts beautiful golden-brown spots. The exact timing will depend on your broiler's intensity and the distance from the heat.
- Serve Immediately: As soon as the cheese is perfectly melted and bubbly, remove the baking sheet from the oven. Carefully transfer your glorious tuna melts to plates. They are best enjoyed hot and fresh, when the cheese is at its peak gooiness.
Beyond the Basic Bite: Elevating Your Tuna Melt Experience
While the classic tuna melt is undeniably delicious, there's always room for personalization and enhancement. Think of it as a canvas for your culinary creativity.
Ingredient Upgrades & Creative Variations
- Greens and Garnish: A slice of ripe tomato added *after* broiling (or even before, if you like it warm) provides a fresh, acidic counterpoint. A few crisp lettuce leaves or even a handful of peppery arugula can add a delightful freshness.
- Avocado Love: Slices of creamy avocado are a fantastic addition, offering healthy fats and a smooth texture. Add them after broiling to prevent them from becoming mushy.
- Heat Seekers: A drizzle of your favorite hot sauce or a sprinkle of pickled jalapeños can really kick things up a notch.
- Gourmet Touches: Capers for briny pops, sun-dried tomatoes for concentrated sweetness, or a sprinkle of chopped olives for a Mediterranean twist can all elevate your sandwich.
- Different Breads: Experiment with ciabatta, focaccia, or even a bagel for different textures and flavor profiles.
Perfect Pairings and Serving Suggestions
A tuna melt is a hearty meal on its own, but it pairs wonderfully with a few simple sides:
- Classic Companions: A bowl of tomato soup is a quintessential pairing.
- Fresh & Light: A crisp green salad with a vinaigrette dressing offers a refreshing contrast.
- Crispy Sides: Potato chips or crispy pickles are always a hit.
Troubleshooting Common Tuna Melt Challenges
- Soggy Bread: The most common culprit! Always toast your bread lightly first, and don't overload with excessively wet tuna salad. A very thin layer of mayonnaise on the bread can also help create a moisture barrier.
- Unevenly Melted Cheese: Ensure your cheese is shredded, not sliced. If you have a powerful broiler, try moving the rack a little further away, or rotate the baking sheet halfway through broiling.
- Dry Tuna Salad: This is usually due to insufficient mayonnaise or lack of acidity. Don't be afraid to add more mayo and a good squeeze of lemon juice or a dash of vinegar.
Conclusion
The ultimate tuna melt is more than just a recipe; it's a celebration of comfort food done right. By focusing on a flavorful, well-balanced tuna salad and mastering the nuanced art of broiling, you can transform simple ingredients into a truly unforgettable meal. Whether you're a long-time tuna lover or looking to convert tuna haters, this comprehensive guide provides all the tips and tricks you need to achieve melty, crispy, savory perfection. So, preheat that broiler, gather your ingredients, and prepare to indulge in a sandwich that truly stands the test of time and taste.
